This guide will help you get out of relay mode on your helium miner.
This may not be an exact step by step guide for your particular router but your router should be very similar.
Disclaimer: We are not responsible if you damage your router in anyway. However following our guide is safe. Please do not change anything you don't see in our guide. Doing so will be at your own risk.
We are currently working on making step by step guides for as many common routers as we can but please understand this will take time.
Before we start please make sure you have checked out our relay guide by clicking the link below and make sure you have followed the steps before starting. If you did not read those they have been attached below for reference.
What do I need before I start?
There are a few things we need to gather first before we start to make the process a lot easier.
- You home routers local IP address.
- Your home routers default username and password.
- Your helium hotspot miners local IP address.
- (Optional) Your home routers public IP address.
If your not sure how to find this information simply click the step you need help with to go to a how to guide.
Once you have these you can write them down or screenshot them if you prefer.
Your now ready to setup port forwarding.
Port Forwarding Guide
In this guide I will be using a custom DD-WRT router. This is a great custom firmware that can be installed on many routers. We understand you may not have the same router setup but you will be able to find these options in your own router. Simply follow the steps the best you can until you find port fowarding.
- Login to your router at its local IP address. Mine is located at http://192.168.10.1
- Sign in with your default username and password you found in the "What Do I Need Before I start?" section.
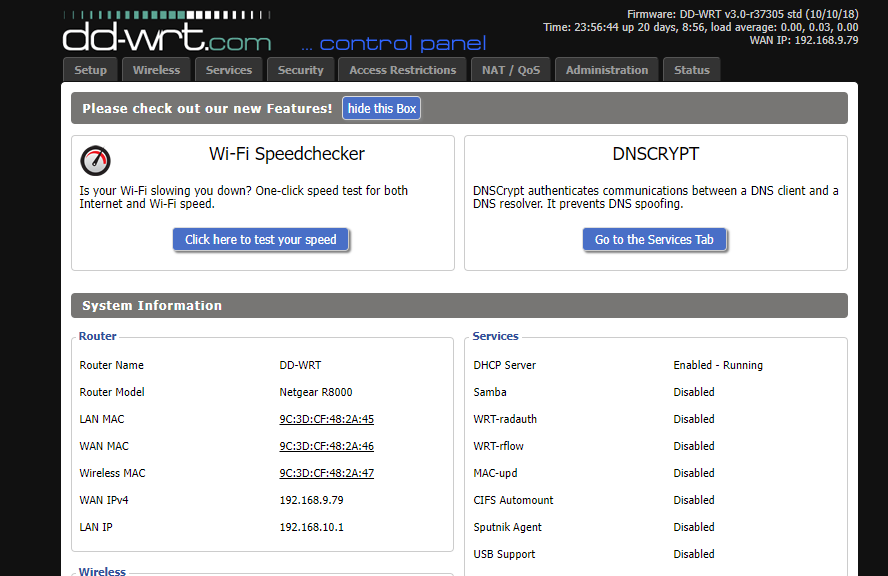
- At this point you will be at your main routers configuration page. Mine looks like this:

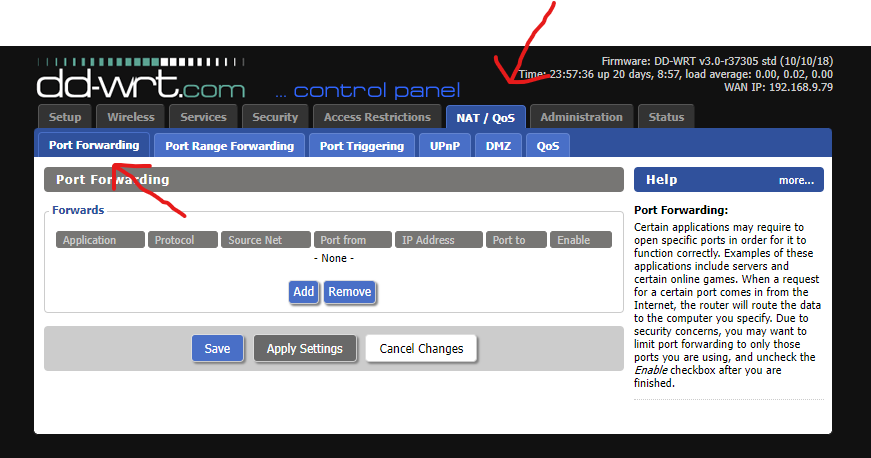
- On the top row or the side row of options you will need to look through each of the menus for "Port Forwarding" which can be located under many differnt menus for example "NAT", "Firewall", "Security", "Administration" etc. Your router will likely have a different name then mine. In my case I found that the tab "NAT/QOS" had port forwarding menus in it.
- After clicking "NAS/QOS" I then clicked "Port Forwarding" as shown in the photo below:

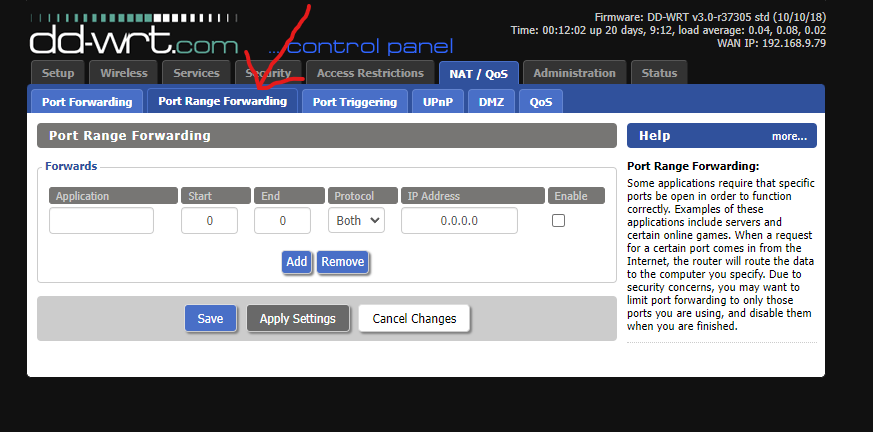
- Once you found port forwarding options like I have above. We want to make this as easy as possible. Instead of using the port forward menu I pointed at above we want to use "Port Range Forwarding" this option is more commonly found on routers and is a bit easier than having to setup normal port forwarding.
- In my case im going to click the "Port Range Forward" tab as shown in the picture below:

- After clicking "Port Range Forwarding" I clicked the "Add" button in my case to give me one blank row as you can see in the photo above.
- This step is typically the same for most routers so a lot of this you can just "copy and paste".
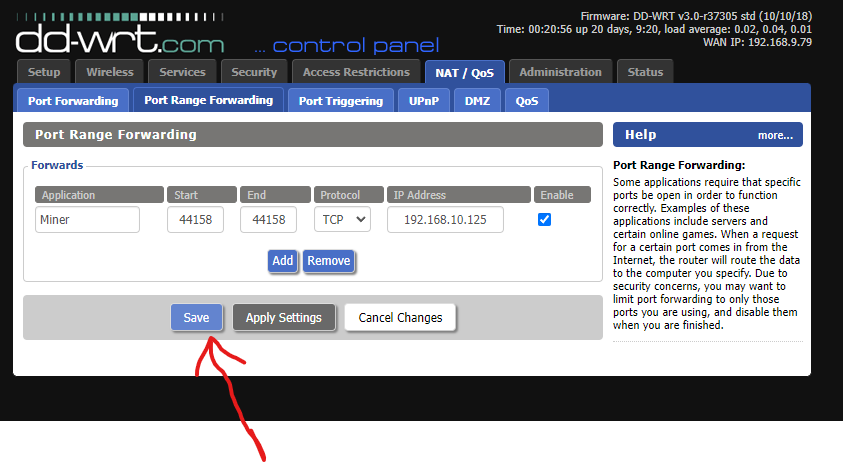
- Application Name: You can use anything you want here for example "Miner"
- Start: This is the port starting number. We only want to open port 44158 so our starting port range is "44158"
- End: This is the port ending number. Again, we only want to open port 44158 so our ending port range is also "44158"
- Protocol: Usually its okay to keep this box set to both however Helium says they recommend using 'TCP" so in this case I will use "TCP"
- IP Address: This box here will be different then my box so don't copy this from my photo below instead you need to use your miners local IP address not mine.
- Enable: You may or may not have this option. If you did just simply check the box to make sure its enabled.
- Before proceeding look at my photo setup below and make sure you followed the steps above before saving anything.

- If everything is correct you can finish by saving. In my case I clicked "Save" as shown in the photo above. Then I clicked "Apply Settings" again this step could be different for you but you should at least have a save button.
- After completing the steps above now you can restart your router.
At this point you should now have working port forwarding on port 44158 going to your miners local IP address.
We still have one last step that is optionally but recommended. This is setting a static IP address for your Helium hotspot miner. This would prevent the miners local IP address from ever changing. We will update this guide with a link to the static IP guide soon so be on the look out in our Helium category on The Crypto Intent website.
Your done! Now its time to test your connection to make sure you did everything right.
Click Here For Connection Test Guide

